
Report
![[Laser cut and engrave] Centering Jig for xTool F1](https://image-res.atomm.com/resource/xtool/community/attachment/xtool-community/84a4caa1-4c17-4557-a467-dccf5399ab07?x-oss-process=image/resize,w_1200,h_900,limit_0/interlace,1/format,webp/auto-orient,1)
![[Laser cut and engrave] Centering Jig for xTool F1](data:image/png;base64,iVBORw0KGgoAAAANSUhEUgAAAAoAAAAKCAYAAACNMs+9AAAAAXNSR0IArs4c6QAAABdJREFUKFNjZCASMBKpjmFUId6QIjp4AAppAAuXjCs4AAAAAElFTkSuQmCC)
![[Laser cut and engrave] Centering Jig for xTool F1](https://image-res.atomm.com/resource/xtool/community/attachment/xtool-community/84a4caa1-4c17-4557-a467-dccf5399ab07?x-oss-process=image/resize,w_200,h_150,limit_0/interlace,1/format,webp/auto-orient,1)
![[Laser cut and engrave] Centering Jig for xTool F1](https://image-res.atomm.com/resource/xtool/community/attachment/xtool-community/4b0aa4e9-3064-46f8-8e15-ea9c897c7309?x-oss-process=image/resize,w_200,h_150,limit_0/interlace,1/format,webp/auto-orient,1)
![[Laser cut and engrave] Centering Jig for xTool F1](https://image-res.atomm.com/resource/xtool/community/attachment/xtool-community/6b1e018a-a6fa-4c78-aae6-ddd44a9ef7f5.JPG?x-oss-process=image/resize,w_200,h_150,limit_0/interlace,1/format,webp/auto-orient,1)
![[Laser cut and engrave] Centering Jig for xTool F1](https://image-res.atomm.com/resource/xtool/community/attachment/xtool-community/b7d5e0d7-02b6-4eb0-a895-7afac160c8b0.JPG?x-oss-process=image/resize,w_200,h_150,limit_0/interlace,1/format,webp/auto-orient,1)
Centering Jig for xTool F1
 Instruction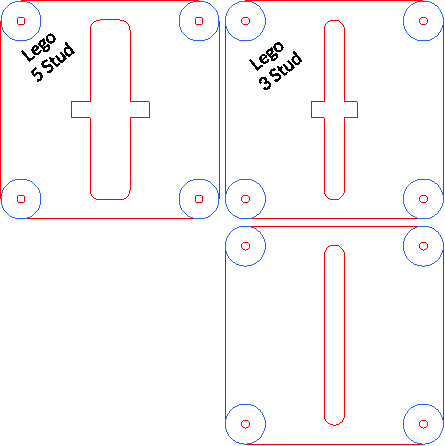
Fixture_F1
.xcs
Application scenario
Laser processing
Machine & module

xTool M1 Ultra
20WCompatible xTool Machine
New
M2
10W, 20WF2 Ultra UV
5WF2
15WP3
80WF2 Ultra
40WF1 Ultra
20WM1
5W, 10WD1
5W, 10W, 20WD1 Pro
5W, 10W, 20W, 40WP2
55WF1
10WS1
10W, 20W, 40WM1 Ultra
10WP2S
55WMaterial used

1/8"(3mm) Basswood Plywood

82
2559
Information
      This centering jig makes engraving with the xTool F1 faster, cleaner, and easier. By inserting the jig through the removable bottom panel of the F1, your object is perfectly aligned in the center of the laser – every time. Designed for repeat jobs and precise placement, this two-layer wooden frame holds small objects in place without manual measuring or repositioning.

Looking for a clean way to organize your jigs? Check out the matching Storage Box for xTool F1 Centering Jigs and keep everything neat and ready to use!
https://www.designfind.com/project/47818
Instruction
1
Step1: Create your top layer shape

Preview

Preview

Preview
6 More images
You’ll customize your jig using the included base template.
In xTool Creative Space:
- Duplicate the top layer template.
- Ungroup all objects to access individual elements.
- Place your object’s shape centered on the square template.
- Select your shape + inner slot, then click "Combine" or "Weld" to subtract it.
- Group all elements again.
- Optional: Add text for size or part name.
📌 You can repeat this step to make multiple jigs for different parts.
2
Step2: Laser Cutting

Preview
Cut both the top and bottom plate of the jig from 3 mm plywood.
- The bottom plate includes a slot to remove the object after engraving.
- The top plate has the exact shape of the part you want to engrave.
3
Step3: Assembly

Preview

Preview

Preview
Align both parts using the centering holes.
You can:
- glue them together
- use screws for a firm but removable fit
- or insert magnets (recommended for flat materials / materials that need to be flattend like paper)
4
Step4: Placement in the xTool F1

Preview

Preview
Remove the base plate of the F1.
Insert the jig – it fits snugly into the opening.
Your material is now perfectly centered under the laser.
5
Step5: Engraving
In xTool Creative Space, simply choose “Center-Center” as your engraving position. No need for measurement or alignment – just start the job.
Looking for a clean way to organize your jigs? Check out the matching Storage Box for xTool F1 Centering Jigs and keep everything neat and ready to use!
https://www.designfind.com/project/47818
Comments
Remixes



You may also like

Alignment Jig for Multilayered Objects

17
89

F1 Ultra Business Card Jig

68
493

$0.99
$0.99
Credits99
Long Reach Tumbler Center Alignment Tool

25

3-Pen Jig for F1

55
259

F1 Baseplate Jigs
20
71

Business Card Jig for xTool F1

707
2660

Golf tee engraving jig for F1

69
280

xTool F1 - 30x55mm Rectangle Keyring Jig
222
946

xTool RA3 Positioning Jig, Precision Alignment for F2 Ultra & UV

3
13

Centering Jig

82
188

Dogtag jig 12 piece for easy engraving with alignment marks

37
300

Bottle Cap Jig (Xtool F1)

11
78

$1.98
$1.98
Credits198
F1 Ultra business card Jig

40

F1 Ultra, 6 business card jig, wood
.JPG?x-oss-process=image/resize,m_fill,w_240,h_240,limit_0/interlace,1/format,webp/auto-orient,1)
15
160

Rounded Keychain Jig for F1

20
173

Dog Tag Jig for xTool F1
483
1409

40mm Challenge Coin Alignment Jig | xTool F1/F2

13
60

F1 to F1 Ultra Jig Converter

54
173